If you are not already using MS Word’s many settings designed to ensure accurate proofreading, you are doing yourself a disservice. After spending countless hours writing, you want to ensure you are presenting your work as professionally as possible. In this article, I explain how to get the most out of MS Word when proofreading your own writing.
Note that the following instructions apply to Word 2007 and later.
Spelling and Grammar Check Basics
You probably already know how to perform a spell check, but do you know how to ensure that your spell check is appropriate for your document and that all text is included in the spell check? The following two steps will ensure your document is being thoroughly and correctly spell checked.
Check Your Language Settings
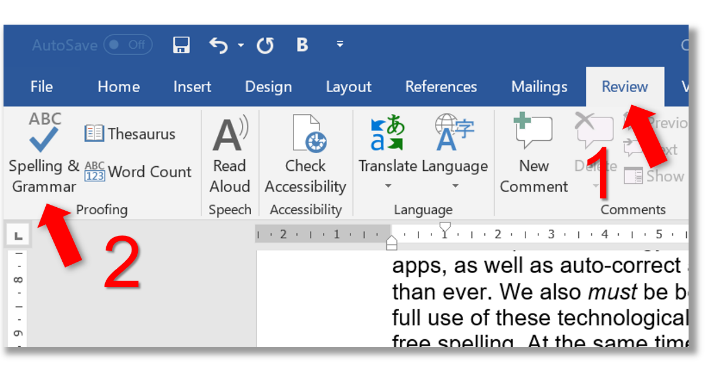
To check your language settings:
- Highlight your entire document (Ctrl+A).
- Go to the ‘Review’ tab.
- Click on the ‘Language’ dropdown menu and select ‘Set Proofing Language’. This will bring up the Language box.
- Select the most suitable version of English, which will be ‘English (Australia)’ for Australian writers submitting to an Australian university or journal.
- Ensure that the ‘Do not check spelling and grammar’ box is clear (i.e. unticked). If you do not do this, some sentences may not be spell checked.

Check Your Proofing Options
It is also a good idea to check your Proofing Options:
- Go to ‘File’.
- Click on ‘Options’. This opens the Word Options window.
- In the menu on the left-hand side, choose ‘Proofing’.
- Under ‘When correcting spelling and grammar in Word’, check that ‘Grammar & more’ (if using Word 2016, otherwise this will be ‘Grammar & Style’) is selected from the dropdown menu.
- Check that the boxes are ticked that allow for errors to be pointed out as you type and for grammar and spelling errors to be checked together.
- Under ‘Exceptions for’, you will need to check that spelling and grammar errors are not being hidden.
Note: If you were checking the formatting of your reference list, you might like to check it once for spelling and then turn off grammar and spell check so that you can check it again closely for formatting. There are times when hiding the grammar and spell check errors is useful.

Taking Control of Your Spell and Grammar Check
Personalising Your Grammar Settings
In the image above, where you selected ‘Grammar & more’ from the dropdown menu, you can also change the settings of the grammar checker. Clicking ‘Settings’ opens the Grammar Settings window. Here, you can decide which error types you want Word to check for and which you don’t. For example, if you are writing in a field that requires the use of passive voice, you might like to turn off that check. You should also check that all necessary checks are ticked.

Adding to Your Personal Dictionary
If you are writing in a field with a technical vocabulary, Word may incorrectly identify some words as misspelled. Rather than ‘ignoring’ these, you should ‘Add them to Dictionary’. This adds those words to your custom dictionary. To manage the words in your custom dictionary (e.g. if you have accidentally added a misspelled word to the dictionary):
- Go to Proofing Options (as above) and look for ‘Custom Dictionaries’.
- The tick box ‘Suggest from main dictionary only’ should be clear. This way, Autocorrect will make suggestions from your custom dictionary as well.
- Click on ‘Custom Dictionaries’ to open a window.
- Select the default custom dictionary and select ‘Edit Word List’. You can then delete entries.

Running Your Final Spell Check
Having adjusted all of the above settings, not only will you have been able to correct your typos and grammar errors as you type, but your final grammar and spell check will also be considerably faster and more effective.
- You will be sure that your whole document is being checked according to your target language.
- You will have excluded any grammar checks that you do not require, saving time.
- You will have excluded any correctly spelled words that are not recognised by Word’s spell check (e.g. technical vocabulary, author names), saving even more time.
- By reducing the length of the grammar and spell check, you will be less likely to rush the check, missing important errors.